Sewing: Tricking up the Unisex Shirt to a Dress

Do you like to rework sewing patterns to add your own flair? Rhi Tomholt from @rhi___made sure has the magic touch when it comes tricking up a sewing pattern and making it her own.
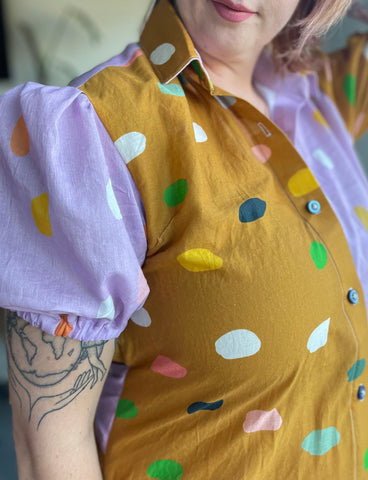
Rhi fashioned the Everyday Unisex Shirt sewing pattern and transformed it into a dress with puff sleeves and ties with our new organic cotton voile. She spliced up two Nerida Hansen designs - Summer Spot Large in mustard and lilac for an extra something. It is a winner!
Rhi fashioned the Everyday Unisex Shirt sewing pattern and transformed it into a dress with puff sleeves and ties with our new organic cotton voile. She spliced up two Nerida Hansen designs - Summer Spot Large in mustard and lilac for an extra something. It is a winner!

Follow along with Rhi's steps to do a copycat hack.
Step 1. I measured my chest and decided to cut a size L for a bit of extra ease. I measured from my shoulder to the desired length (knee length for me) and slashed the pattern along the lengthen line. It worked out that it was the length of an A4 piece of paper that I wanted to add to the shirt.

Step 2. I also wanted to make the sleeves a bit bigger for the puff factor, so I added a few inches either side of the pattern piece when I cut it out.


Step 3. I cut a piece of fabric approximately 15cm wide and two metres long for the ties. I sewed these up right sides facing, turned it right way out and cut in half to get two one metre long ties.


Step 4. I followed all of the steps as they were up until the sleeves. Here, I gathered the head of the sleeve before adding it to the body.

Step 5. I pinned the ties to the side seams right sides facing (ties across the front of the body) before sewing up the side seams. I added standard in seam pockets just under the ties.


Step 6. I sewed the sleeve hem with a small gap to fit in the elastic - measured to arm circumference and an inch for beginner sewing. I thread this through the hem with a safety pin, sewed the ends together and closed up the gap on the hem.

I finished the read of the dress and hems as per original instructions. I found the pattern a lot of fun to make - it was challenging in some parts though. The collar attachment and yoke were great new skills to learn and the pattern was well written and explain these steps.

The fabric was a dream to work with! When I received it I was a bit apprehensive being that it was very soft and light and I imagined it would be like sewing slippery, nightmarish viscose but my machine handled it well. The only thing would be to sew extra carefully, as any unpicking will result in little holes.
Once on it's not see-through as I expected! It's light and perfect for summer. I'll be buying all the fabric when it is released.


Step 5. I pinned the ties to the side seams right sides facing (ties across the front of the body) before sewing up the side seams. I added standard in seam pockets just under the ties.


Step 6. I sewed the sleeve hem with a small gap to fit in the elastic - measured to arm circumference and an inch for beginner sewing. I thread this through the hem with a safety pin, sewed the ends together and closed up the gap on the hem.

I finished the read of the dress and hems as per original instructions. I found the pattern a lot of fun to make - it was challenging in some parts though. The collar attachment and yoke were great new skills to learn and the pattern was well written and explain these steps.

The fabric was a dream to work with! When I received it I was a bit apprehensive being that it was very soft and light and I imagined it would be like sewing slippery, nightmarish viscose but my machine handled it well. The only thing would be to sew extra carefully, as any unpicking will result in little holes.
Once on it's not see-through as I expected! It's light and perfect for summer. I'll be buying all the fabric when it is released.

For more sewing patterns visit www.neridahansen.com.au and to stay on top of fabric drops watch this space, @neridahansen.


